Wednesday, November 21, 2012

Egg In A Nest


This easy breakfast dish is one of those dishes passed on from mother to daughter in a southern kitchen. The best part of this dish is how easy it is! In just a matter of a couple of minutes, there is a hearty breakfast waiting for you. It's so simple for college students and is much better for you versus the boxes and boxes of sugared cereal or bagels and cream cheese. After all, eggs are a great source of protein! Caviar Contessa will especially love this since she loves her fried eggs!

What you need:
(Serves 2 people)
- 1/4 stick butter, softened
- 2 slice of whole wheat bread
- 1 small glass
- 2 egg
- 1 dash of pepper
- 1 dash of pepper

What you do:
1) Warm griddle. 
2) Melt butter on griddle.
3) Place glass upside down on each piece of bread cutting out a circle in the middle.
4) Place circle cut-out and remaining bread on the griddle. Toast each side of bread.
5) Crack an egg in the middle of the bread (in the nest). 
6) Sprinkle a dash of salt and pepper on the egg.
7) Cook egg 1 minute before turning over and cooking the other side.
8) Serve!


Southern Living Herbed Cheese Spread

The College Contessas are cheese lovers! This may or may not be a good thing, but we are definitely fascinated by different types of cheese and even the cheese making process (Ask Caviar Contessa for details). This herbed cheese spread is perfect for holiday time when you have friends and family around the table. In my family, we call this time, cocktail hour. Just make it 24 hours a ahead of time and it will be delicious!

Makes: about 2 1/2 cups
What you need:
- 1 (8-ounce) package cream cheese, softened
- 1 (8-ounce) package feta cheese, softened
- 1/2 cup butter, softened
- 3 Tbsp. chopped fresh flat-leaf parsley
- 2 Tbsp. chopped fresh chives
- 1 Tbsp. chopped fresh tarragon
- 2 tsp. lemon zest
- 1 tsp. freshly ground pepper
- 1 garlic clove, pressed
Garnish: fresh rosemary sprigs, sweetened dried cranberries


What to do:
1) Beat first 9 ingredients at medium speed with an electric mixer 2 to 3 minutes or until smooth. Add salt and freshly ground pepper to taste.
2) Line 2 (10-oz.) ramekins with plastic wrap, allowing 3 inches to extend over sides; spoon cheese mixture into ramekins. Cover and chill 24 hours.
3) Invert cheeses onto serving dishes. Serve with crackers and assorted veggies. Garnish if desired.


Tuesday, November 20, 2012

Southwestern Cornbread Taco Salad


This colorful salad is as colorful as it is delicious! This dish is great for parties or big family gatherings.  Add a little fiesta to your life with this southwestern style taco salad.

What you need:
- 1 (6-ounce) package of Mexican or plain cornbread mix
- 1/2 bottle of Hidden Valley Ranch dressing
- 1 small head romaine lettuce shredded
- 2 large tomatoes, chopped
- 1 (15-ounce) can of black beans, rinsed and drained
- 1 (15-ounce0 can whole kernel corn with red and green peppers, drained
- 1 (8-ounce) package shredded Mexican four-cheese blend
- 6 bacon slices, cooked and crumbled
- 5 green onions, chopped

What to do:
1) Prepare cornbread according to package directions; cool and crumble. Set aside.
2) Layer in a bowl bowl half of the cornbread, lettuce, tomatoes, black beans, corn, cheese, and bacon. Spoon half of the dressing evenly over top. Repeat layers with remaining ingredients and dressing.
3) Cover and Chill AT LEAST 2 HOURS for best taste.


Dinner Made Simply: Tomato, Herbs & Pierogies


This is a simple dinner dish for those nights when you are on-the-go and don't have much time for cooking. It's absolutely delicious! 

What you need:
- 8 Mini Frozen Pierogies - Either Four cheese stuffed or Spinach and Cheese stuffed
- 2 Tbsp. Olive oil
- 10 - 15 Grape Tomatoes
- 1 Tbsp. of basil leaves
- 1/2 clove of garlic - minced
- 1 tsp. chopped thyme
- 1 tsp. chopped Rosemary
- 1 tsp. chopped Parsley
- 1 tsp. Italian Seasoning
- 1 pinch Black Pepper
- 1 pinch Salt

What to do:
1) Boil 3 cups water.
2) Add Pierogies and cook for 6 - 8 mins.
3) Drain Pierogies.
4) In the same pot, add olive oil, basil leaves, garlic, thyme, rosemary, parsley, italian seasoning, black pepper, and salt. Cook herbs for 2 minutes. 
5) Add grape tomatoes and pierogies. Cook until tomatoes are soft and pierogies have a crisp exterior. 
6) Serve!


Thursday, November 8, 2012

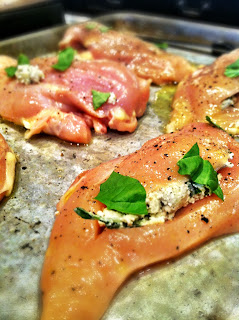
Gorgonzola Basil Chicken


During fall break the contessas chose to forgo the "frat beach" of the Georgia-Flordia and instead decided to channel our inner housewives.  We finally had a kitchen large enough to fit our passion for the culinary arts as well as our extravagant personalities.  We vacationed in Asheville, North Carolina, home of Café Contessa, where we cooked like we never cooked before! This delectable chicken dish was only part of the exquisite meal we prepared for Café's family and friends.  

What you need:
-Boneless-Skinless Chicken Breasts (However many you are cooking for)
-Softened Gorgonzola Cheese (a wedge will do)
-Fresh Basil Leaves (about 3 per chicken breast)
-Extra Virgin Olive Oil
-Kosher Salt
-Ground Pepper

What to do:
-Preheat the oven to 350 degrees and coat the pan with olive oil or some kind of cooking spray
-Rinse the chicken, and if you are looking to cut calories you can cut the fat
-Place the clean chicken on the oiled pan, and take a sharp knife and make a slit through the middle of the chicken that creates a pocket to place in the cheese and basil
-Massage the chicken with olive oil
-For the basil, strip the leaves from the stem and use kitchen scissors or a knife to cut the leaves into strips
-In a bowl mix the softened Gorgonzola cheese and the basil strips
-Equally divide the gorgonzola mixture (we made little balls about the size of a ping-pong ball)
-Place the divided mixtures in the pocket in the chicken breast
-You are ready to bake! Set in the oven for 40-45 min at 350 degrees.


College Contessa Rating: Corporate Pump!  We all agreed that this could of been a little juicer.  If you use chicken breasts on the bone and with skin it's going to melt in your mouth!  

Monday, October 22, 2012

TREAT YO SELF Salted Caramel Chocolate Chip Cookie Bars


Everyone loves anything that's salted caramel flavored right? And chocolate chips. They don't hurt either. That's why I decided to make Salted Caramel Chocolate Chip Cookie Bars because they sound delicious and who doesn't want to treat themselves to a bar of every flavor you could ever want? Also, I have been watching reruns of Parks and Recreation and I wanted to treat myself as Donna and Tom did in one of the episodes. I decided to treat myself to something that I could only dream about: a simple recipe for combining chocolate, caramel, and a kick of salt in cookie bar form. This is so easy and delicious!

What you need:
-2 rolls of chocolate chip cookie dough
-2 bags of caramel chews (I used Werthers, each bag was about 5.5 oz)
-Sea salt
-9x11 inch pan (you can use another size, but this size worked perfectly for pressing the cookie dough into)
-cooking spray

What to do:
1) Preheat the oven to 325 degrees and spray your pan with cooking spray
2) Open up one of the cookie dough packets and break it apart into pieces to start softening it up. Then, press the pieces to the bottom of the inside of the pan to coat the bottom completely
3) Put the caramel chews into a microwave safe bowl and microwave in 20 second increments until it melts completely. This should take about 2 minutes. The caramel should be liquid and thick like caramel usually is.
4) Pour the caramel over the top of the cookie dough pressed into the pan until the cookie dough is completely covered. Then sprinkle the sea salt on top. You can add only a dash or a whole bunch but try to do it evenly.
5) Open up the other pack of cookie dough and break this into pieces again. This time, you place the cookie dough on top again without making the caramel ooze out. Do the best you can. I had to complete a puzzle to cover the top of the caramel because the cookie dough doesn't always press down into the shape you want. It will all bake out into an even shape as long as the top is covered relatively equally.
6) You can put some more sea salt on top if you would like. Place in the oven for 25-30 minutes and enjoy!!

College Contessa Rating: Most definitely a Platform Stiletto


These are an undeniably delicious treat for any occasion. If you would like to make the cookie dough yourself, feel free, this will work just as well. I am a college student therefore, I didn't want to spend the time and money on making my own cookie dough. You will love these! And they keep really well so you don't have to worry about them drying out really quickly.

Monday, October 15, 2012

Shake it for me, Luke! peach cobbler bites


Seeing Luke Bryan on his farm tour inspired me to get back to my roots. Peach pie, sweet tea, and country music. And I wanted to make something you could eat after or during shaking it to Luke Bryan's country tunes so I decided to make peach cobbler bites. I will warn you, these are delicious but unless you want peachy goodness to get all over you, you will need a fork and plate to eat them. So once you make these, go dance on a tailgate in a pasture like Luke Bryan sings about in a lot of his songs. I have never actually done this but hey, maybe I will after I make these.

What you need:
-1 cup of sugar
-1 cup of flour
-1 can of sliced peaches
-2 tablespoons of baking powder
-a splash of salt
-a stick of butter
-brown sugar
-3/4 of a cup of milk

What to do:
1) Preheat the oven to 350 degrees.
2) Mix together the sugar, flour, baking powder, the salt, and the milk into one bowl.
3) Melt the butter.
4) Open the can of peaches and pour out most of the juice without squishing the peaches. The leftover juice should be added to the sugar/flour/baking powder/ect. mix then dice the peaches into about 4 pieces of each slice.
4) Put two and a half teaspoons of butter into each of the muffin tin cups. Then add two and a half tablespoons of your mix of ingredients on top of that. After that, add a tablespoon of peaches on top which is about 3 pieces.

5) Sprinkle brown sugar over the top of each to your liking then put the cobblers into the oven.

6) Keep these in there for 12-14 minutes and then viola! You are ready to shake it and eat some peach cobbler bites as a reward!!

These are delicious and actually taste like a real peach cobbler but they would be even better with vanilla ice cream on top. So go listen to some classic Luke, shake it, get drunk on someone, and take off your leaving dress or whatever country star you choose's songs inspire you to do and eat these peach cobblers to have a good ole' Southern Night!

College Contessa Rating: Corporate Pump

Sunday, September 30, 2012

Grillin' and Chillin': Grilled Pear Gorgonzola Salad

I have eaten one of these in a restaurant in downtown Roswell and fell in love with it. I am not someone to spend tons of dollars on salad toppings that make little to no difference in the taste but the money I spent on this was well worth it. I added chicken to this salad to make it my main meal but it can be done without it or with salmon or steak pieces.

Ingredients:

-one pear
-gorgonzola cheese ( i bought a prepackaged triangle's worth from Publix and had more than enough)
-chicken
-mixed spring lettuce
-balsamic vinaigrette

What to Do:
  1. Grill the chicken up. I used our knock off George Foreman grill and cooked it until there was no pink in the middle but there was still definite juiciness.
  2. Cut the pear in half. Put the pear on the grill or as I did on the Trim and Fit (George Foreman knockoff) and let it sit with the top open for around 5-7 minutes. You want to see indentions or grill marks on the pear to know that it is done.
  3. While the pear is grilling, add enough lettuce to your plate to cover the bottom to your liking. I added about 2.5 cups. Crumble the gorgonzola cheese on top. Add as much or as little as you like. This cheese is totally delicious so you may be adding more than you think after you sample it. Then add on the chicken. I shredded mine just a little but you can just chop it up or put it on whole.
  4. Add the pear on top of the lettuce once it has finished grilling and then the balsamic vinaigrette on top. I added about two to three tablespoons.
  5. Viola! You are done! At this point, you can add whatever you like if my toppings are not enough for you. Candied pecans would be very delectable on top however I did not want to pay for them.


College Contessa Rating: Corporate Pump

Friday, September 28, 2012

Comfort Food on a Cold Day


What says "comfort food" better than grilled cheese? But, this is no ordinary grilled cheese. The Contessas are anything but ordinary. After a long, rainy, cold day one of our college contessas decided to take grilled cheese to another level.


The best part is how simple this grilled cheese is to make!

Ingredients:

- 2 Slices Whole wheat bread
- 1 Avocado
- 1/2 Tomato
- 3 slices Mozzarella Cheese
- Parmigiano Cheese
- 1 tablespoon Pesto 
- Butter

What to Do:
  1. Cut thin slices of tomato and mozzarella cheese. 
  2. Spoon out avocado. Use 1 full avocado.
  3. Put a thin layer of pesto on the inside of two pieces of bread.
  4. Layer the tomato and avocado, tomato, and avocado. 
  5. Butter the outside of the grilled cheese.
  6. Shave Parmigiano cheese on the outside of the bread.
  7. Grill the grilled cheese for approx. 5 minutes until cheese is melted.


College Contessa Rating: 

Tuesday, September 25, 2012

Chocolate Chip Nutella Cake Bars

Frank Sinatra once crooned, "the best is yet to come," and it finally has with this tailgate inspired dessert. Chocolate. Nutella. Cake. In BAR form. Really, few things in life can match the ever comforting texture of a soft, chocolate filled piece of cake. Now, I am not entirely sure on what I would classify these as on the cake  vs. cookie bar debate, but I would liken them to the texture of a brownie. Either way, they will impress you.

This creation got its start with the very own Caprese Contessa's sweet mama, and then somehow ended up in the hands of one desperate for a tailgating recipe Caviar Contessa. Before you knew it, voila! The contessas were living and eating large.

Now, I must regrettably note that there are no documented photos of this recipe. Not because they were unsightly (trust me, they were not!), but the contessas ate every. last. one. quickly.

Now go put on your sweatpants because you are invariably going to end up eating every last one of these bars like we did.


Ingredients:
 *199,000 thanks to the original Caprese Contessa for providing the delectable "bones" of this recipe

-1 package (18.5 ounces) Butter Recipe Golden Cake Mix (or any store brand)
-1/3 cup sugar
-8 ounces sour cream (do not use the low far or non-fat...will make the cake dry) *This made the bars SO good!
-2/3 cup canola oil
-3 large eggs
-1 teaspoon pure vanilla extract
-1 package (12 ounces) mini semisweet chocolate chips (the Caviar Contessa used jumbo chips for added "heft")
-2 tablespoons Nutella (a Caviar Contessa addition--it'll give your bars a nice light brown "tan")
-1/2 cup mini marshmallows (for topping)

What to Do:
(College girl style)

  1. Preheat oven according to instructions on box (325 degrees)
  2. Pour all ingredients into medium-large mixing bowl (did I mention this was a one-bowl recipe?!), and whisk until smooth (no electric mixers necessary).
  3. Grease pan or cake tin with cooking spray, and pour contents into pan
  4. Bake for 40-50 minutes or until fork comes out clean of cake
  5. Top cake with marshmallows in last five minutes of baking or until marshmallows puff and lightly brown.
  6. Let cool 10-15 minutes, and cut into squares and serve.


College Contessa Rating: Platform Stiletto


Scrumptious Smores Bark


What is one thing that all college girls love? CHOCOLATE! The contessas decided to take this love of chocolate and combine it with marshmallows and graham crackers, to recreate the classic smore! All we can say about this recipe is: YUM!


Ingredients: 
*Nothing needs to be exact measurements in this recipe. Add however much you want!

-Graham Crackers
-Marshmallows
-Semi-Sweet Chocolate Chips
-Nutella


What to Do:
  1. Break up Graham Crackers into bite size pieces
  2. Lay Graham Crackers on baking sheet
  3. Top with Marshmallows and chocolate; drizzle on the Nutella
  4. Broil on low for 3 minutes. (Make sure you watch closely because the marshmallows toast up quickly!
  5. DIG IN

College Contessa Rating: Cowboy Boot Heel

Skinny-licious Pasta Salad


If there is one thing that this Brown Sugaa Contessa could eat all day, it is pasta salad. I've always wanted to try and make some variety of pasta salad, but I never knew what to put in it to make it taste lip smackin' good! This pasta salad is perfect for a college girl's budget, time schedule, and waist line! 

Ingredients:
*You can add in whatever your favorites vegetables are!

-1 Box Whole Grain Penne Pasta
-1 Small Jar of Black Olive Slices
-1 Green Bell Pepper
-1/2 of a Red Onion
-1/4 Cup of Grated Parmesan Cheese
-1 Cup of Italian Dressing (I used Marie's, but any would be great)

What to Do:
  1. Cook penne pasta to al dente (about 9 minutes)
  2. Chop onion and bell pepper.
  3. Drain pasta and rinse under cold water.
  4. In a large bowl, combine chopped veggies, cheese, italian dressing, and pasta.
  5. For best results, refrigerate for about 3 hours before serving. 

College Contessa Rating: Corporate Pump

Monday, September 24, 2012

Contessas Tailgate!


Football season is officially in swing, and the College Contessas are all about it!  We put on a full tailgate for the UGA vs. Vandy game, and it was nothing short of finger-lickin'.  All the Contessas divvied out their best game day cuisine.  
Contessas got some junk in the trunk

Only a portion of our mouth-watering spread

There was pasta salad, berry-walnut salad, the "Make You Spin-ach Dip", chickpea salad, jalapeño-cream cheese spirals, m&m white-chocolate covered pretzels, the "Easy as Pumpkin Pie Cupcakes,"and Chocolate-Chip Nutella cake!!  It's hard to believe we made it to the game because the variety of luscious goodies were so unbelievable.  We are going to have many of these recipes up soon!


Let's not forget that behind our demur manner, and elegant way we portray ourselves, that we are all college students at heart.  That's why we freaked out when we met this UGA legend at our tailgate!! If you can't see, there is an old man with a bulldawg painted on his head that has been coming to UGA games since some of our parents were in school.  This painted vision had his eye on Caviar Contessa, and dragged her back to his truck to give her signed pictures of himself.  We are still debating whether this was nice or creepy.

Someone is getting a little crazy...and we love selfies with a passion.
XOXO,

College Contessas


Saturday, September 22, 2012

Chicken Alfredo Classico


This is a fairly easy meal to make if you have everything cooking at one time: sauce, noodles, and chicken. The recipe for the Alfredo sauce was developed over several tries, but is finally just the right blend of ingredients for a taste that is perfetto (and will leave some leftovers!). You can definitely spice up this meal with some fruits and veggies added in addition to the chicken! If you're really not feeling up to making your own sauce, a jar of store-bought Alfredo sauce will work almost as well, but if you ask me, there's always something that's a little better and more classy about a homemade meal.

Ingredients:
-Sauce:
   -1/2 cup butter
   -1 package (8oz) cream cheese
   -1 cup half-and-half
   -1/3 cup finely grated Parmesan cheese
   -1/4 tablespoon garlic powder (optional)
   -2 pinches of pepper
-1 chicken breast
-1 box Rigatoni pasta
-1 pinch of parsley


What to Do:
   Sauce
  1. Melt the butter in a medium saucepan (on a medium stove-top burner setting). Once the butter is almost completely melted, add the 8oz of cream cheese. (It's easier if you cut up the cream cheese and butter if it is the stick version so that they melt quicker.)
  2. Mix the butter and cream cheese well together. Add the cup of half-and-half, Parmesan cheese (I like to grate my own!), garlic powder (optional), and pepper. Stir all of the ingredients until they are mixed well together.
  3. After mixing, turn the burner down to low and let the pan sit for about a minute or until it's thickened a little. Stir about every 20-30 seconds. Then, remove the pan from the burner and set it aside so it can finish thickening.

   Chicken
  1. Fully cook 1 chicken breast.
  2. Cut the breast into slivers/slices and finish browning the chicken on a stove-top pan.

   Pasta (al dente)

  1. Cook desired amount of pasta on the stove top (al dente).
  2. Follow the directions on the back of the box for cooking the various types of pasta. (I usually fill a saucepan half way with water and let it come to a boil. Then, I pour in half of the box of pasta and let it cook for about 10 minutes or until the noodles are softened.)
After each section of the meal has been cooked, put the pasta on a plate and pour the desired amount of sauce over the pasta. You can then add the chicken to the mix as well. Sprinkle a pinch of parsley over the plate for color and a little extra flavor. Enjoy!


College Contessa Rating: Corporate Pump

Monday, September 17, 2012

Peach-tastic Salsa


I love this salsa. I am just going to tell you this up front. It is to die for. It is really sweet with a definite kick of spicy at the end. You will love it too. And it really isn't difficult. 95% of this recipe is chopping so it isn't that difficult and goes by fast if you chop to music.

Ingredients:

-2 peaches
-two roma tomatoes
-1/4 of an onion
-one avocado
-two limes
-lemon juice
-one yellow pepper (if you don't want it as spicy choose a green pepper, to kick up the spice use a red one or even habanero peppers)
-chile flakes
-one tablespoon of olive oil
-1/8 of a cup of cilantro
-one clove of garlic

What to Do:

  1. Cut a shallow X into the bottom of each of the peaches. This helps get the skin off of them much easier. Then simmer the peaches in hot water. The skin will start to become really loose, take it out soon at this point. The longer you keep it in in this stage, the mushier the peaches will be.
  2. Then submerge the peaches in a bowl with icy water in them to keep the peaches from mushing. Once the peaches have become cool, peel the skin off. If it doesn't come off easily, put them in the hot water again and try the process over. Once the skin is off, dice the peach up.
  3. Then dice the tomatoes, 1/4 of the onion, avocado, and pepper. I cut the pepper up into even smaller pieces.
  4. Put the onion pieces in a pan and sautee them with a little bit of olive oil. Once they are translucent, add them to the other diced things in a big bowl. At this stage, you have the diced peaches, tomatoes, sauteed onions, avocado, and pepper in a bowl.
  5. Chop the cilantro up and mince the garlic. Add the two to the mixture.
  6. Put one half of a lemon's worth of juice on the mixture and mix together.
  7. Cut the two limes in half. Squeeze the lime juice on the mixture and stir.
  8. Add the chile flakes to your liking. I added maybe two and a half tablespoons worth and that was enough of a kick for me.
  9. Mix all of this together and Ta Daa! You are done!


I put my peach salsa on top of tilapia and it was to DIE for! I also plan on putting it on chicken, salads, and yet more tilapia as well as eating it with chips.


College Contessa Rating: Definite Corporate Pump
Added onto anything else like fish, chicken, or whatever your heart desire and it will most assuredly be a Platform Stiletto

Sunday, September 16, 2012

Ed Sheeran's Cinnamon Suga Biscuits

These easy to make biscuits are a creation of Climbing Contessa. These basic biscuits are covered in a sweet crust of cinnamon sugar that melt in your mouth. Perfect for breakfast or a snack or whenever you want something quick and delicious.

Ingredients:

-Ready to make biscuit dough
-2 tbsp. cinnamon
-2 tbsp. sugar

What to Do:
  1. Remove biscuits from packaging and place on baking sheet. Preheat oven in 375.
  2. Sprinkle with cinnamon and sugar.
  3. Bake for 15-17 minutes or until lightly brown.


And viola! Instant yumminess!


College Contessa Rating: Cowboy Boot Heel 


Brown Sugaaa Roasted Sweet Potatoes!


In an effort to use a single sweet potato to feed a bunch of hungry girls, Brown Sugaaa Contessa decided to make these roasted sweet potatoes! These are delicious and a perfect side dish for a fall meal!

Ingredients:

-1 Sweet Potato
-2 Tablespoons of Olive Oil
-Pinch of Cinnamon
-Pinch of Brown Sugar

What to Do:
  1. Slice sweet potatoes thinly (like potato chip thin)
  2. Spread out sliced sweet potatoes on roasting pan
  3. Sprinkle olive oil, cinnamon, and brown sugar on potatoes.
  4. Mix around with hands.
  5. Bake at 400 degrees until softened and slightly browned.

College Contessa Rating: Cowboy Boot Heel


Wednesday, September 12, 2012

Easy As Pumpkin Pie Muffins


Lately, I have been feeling the spirit of fall. I have also been super swamped with school so I wanted to come up with a way to make something in the essence of fall as well as not spend tons of time or money on it. So I made pumpkin muffins! And they are super easy. Anyone could do this. I mean anyone, even the person that ruins slice and bake cookies could do this. So I dawned my japron (jean apron) and made my dream into a reality. Anyway, this is how to do it and you will love me for this forever because they are delicious and nutritious! (well they are better for you than a cupcake but taste like one so therefore they are more nutritious)


Ingredients:

-One can of canned pumpkin
-One vanilla cake mix
-Brown sugar


What to Do:
  1. Preheat the oven to 350 degrees
  2. Combine the can of pumpkin and the cake mix into a bowl and stir them together.
  3. Add about a handful of brown sugar to the mix. You can add more or less depending on how big of a sweet tooth you are
  4. Put the mix into a cupcake tin. Add a sprinkling of brown sugar on top of every one and bake in the oven for 23-28 minutes.

This recipe for me made 24 cupcakes as well as 12 mini cupcakes

Now I will just warn you, these muffins are pumpkiny but if you were expecting a muffin to overpower you with pumpkin flavor, this is not the correct mix for you. If you want more of a taste of fall in your muffin, I would add some nutmeg, cinnamon, or pumpkin spice flavoring to it. The muffins are definitley pumpkiny but not exactly to the extent that one would have in eating an actual pumpkin if anyone actually does that.

College Contessa Rating: Solid Corporate Pump

One thing that we did to make them 10 times better (even though they are to die for already) was to add chocolate chips to them. This made them much moister and really delicious with the chocolate chips on top. If you want to make it even less healthy, I added some cream cheese icing on top to make them the best things at any party but they aren't super healthy anymore. What a shocker! With the added things on top, this recipe gets bumped into a major Platform Stiletto


Monday, September 10, 2012

Nuts for Nutella Pizza


What is life without the sweeter things in life? By this, I mean food products with large masses of sugar that make you want to lick the skin of your fingers...aka NUTELLA. As your very own Caviar Contessa, I try to live life on the fancier side--eschewing typical college girl food fads (ever had an oreo/smores/snickers red velvet cupcake? me neither.) in favor of more refined morsels, yet I live by one exception, and that is Pinterest's golden child, Nutella. No hype necessary, this seriously good hazelnut paste was meant to be enjoyed in any and all possible forms. Paying homage to its country of origin, the Nuts for Nut-ella Pizza was born.

Ingredients:
(Recipe calls for all ingredients to be read in an "Italiano!" accent)
*Recipe yields 16 servings

-1 Package Pizza dough (this college girl used store bought Pillsbury, but you can make your own)
-Cooking Spray
-1 Jar NUTELLA
-2 Apples
-1/2 Cup Crushed Walnuts

What to Do:
  1. Preheat oven to 400 degrees
  2. Roll out dough and cut into four sections
  3. Grease 2 mid-large cookie sheets
  4. Bake until dough rises slightly
  5. Using a spreading spatula, generously spread nutella onto dough sections (I used about 1/2 a jar)
  6. Sprinkle generously with walnuts
  7. Wash and thinly slice apples, place onto pizza and bake for 6-10 minutes
  8. Eat warm or enjoy later for a cookie-like treat (the nutella will cool and harden slightly)

We served our pizza deliciousness with some strong after dinner undergraduate coffee.

Can you say la dolce vita?

College Contessas Rating: An obvious platform stiletto


Garbage Disposal Stir Fry


This is super easy. I am the kind of cook that will make anything that isn't hard and me being the creative genius that I am came up with this! You can substitute in other veggies or take out the potato if you don't want it to fill you up as much. This is a very low maintenance recipe that can be added to or subtracted from that can make you the perfect side dish or main course to last you for quite a few meals. Just throw in whatever you want and it will be delicious.

Ingredients:
-One squash
-One zucchini
-One baking potato
-One onion
-Four cloves of garlic
-One head of broccoli (the size pre-packaged at the grocery store)
-Two tablespoons of olive oil
-One and one half teaspoons of balsamic vinegar
-One half of a cup of italian cheese

What to Do:

  1. Chop up the whole onion and mince the garlic (I confess, I just use the already minced garlic from the store because I am horrible at mincing garlic).
  2. You can either do this step while the onions and garlic are cooking in the pan or now, depending on how great your chopping skills are. Just in case, chop the squash, zucchini, and potato into thin slices. Then cut the potato slices into halves. Cut the bottom of the broccoli off where none of the tree-looking parts are connected. (don't you love my amazing cooking vocabulary?)
  3. Put the tablespoon of olive oil in a pan and spread it around.
  4. Turn the stove onto medium to high heat and put the pan on the burner. Then place the garlic and onions in the pan and stir them occasionally to not let them burn. Once the onions are translucent, you should start adding everything else in.
  5. Once the veggies have been in there for around two minutes you can add the balsamic vinegar. After this, just stir the veggies around for about seven minutes. You will know the dish is about done when the potatoes become translucent. You may want to taste one to make sure that they are fully cooked or just the way you like them.
  6. Add the italian cheese. I sprinkled it on top to my heart's content and voila! you are finished! enjoy! This will make a ton of food so store it in tupperware or just eat like five servings worth of vegetables.


College Contessa Rating: Cowboy Boot Heel

Make You Spin-ach & Artichoke Dip


On a mission to outshine all the other Contessas, Cafè Contessa knew what she had to do.  It was time to dish out her favorite appetizer, the ever popular spinach and artichoke dip.  But this Contessa was not going to settle for average, she wanted to show the others that coffee isn't the only thing she can brew.  Being Limited to a mere kitchenette and no food processor was not going to give Cafè Contessa the jitters.

Ingredients:

-1/2 cup grated ramano/parmesan cheese
-1 clove of garlic (I use frozen)
-10 ounces frozen chopped spinach, thawed and squeezed dry
-1 (6 1/2 ounce) jar marinated artichoke hearts, drained
-8 ounces soft fat-free cream cheese
-2 large eggs (I used egg whites)
-4 ounces shredded mozzarella cheese

What to Do:
  1. Preheat oven to 375°F.
  2. Place Romano/Parmesan cheese in a blender.
  3. While running, drop garlic in the feed tube.
  4. Start the machine and add spinach, artichokes, cream cheese and eggs, process until thoroughly blended.
  5. Turn into a casserole dish and fold in Mozzarella.
  6. Bake 20-25 minutes or until heated through.
  7. I serve the dip with tortilla chips, but it is also delish with grilled bread.
  8. Enjoy compliments from everyone at the party!

College Contessa Rating: A Sky-High Stilleto Pump of course!!


Saturday, September 8, 2012

How Do You Like Them Apples Chicken


Craving some finer fare, but left with only the college-girl ingredients in her apartment pantry, the Caviar Contessa got to thinking (classy things only), and decided to serve up some apples with her usual baked chicken (perfected by her highness the Barefoot Contessa). And the end result? Fabulosity of course! If you're looking for a way to have your chicken not in nugget form, EAT this (delish.delish.delish). Not only will its serving of apples keep the doctor away, it is sure to impress others with it's perceived fanciness. Easy+fancy=you cannot go wrong. 

Ingredients:

(eating for one)

-1 Boneless, skinless chicken breast (defrosted)
-2 Tablespoons Olive Oil (extra virgin)
-1 Tablespoons Honey
-2 Tablespoons Balsamic Vinegar
-1 Apple (any variety)
-2 Tablespoons Parmesan Cheese
-Dash of Salt
-One Teaspoon Cracked Black Pepper

What to Do:

  1. Preheat oven to 350 degrees
  2. Rinse chicken thoroughly, place on ungreased cookie sheet
  3. (Prepare chicken) Rub with olive oil, honey, and balsamic. Season with salt 'n peppa. Top with Parmesan.
  4. Rinse and thinly slice whole apple, and place atop chicken and in pan (drizzle with balsamic at your discretion)
  5. Bake! *350 degrees for 40-45 minutes until chicken is cooked and succulent
  6. Let rest (study, watch Bravo, live life-- actually don't let rest this long)
  7. Enjoy! I served my apple-y deliciousness atop a bed of fresh farmer's market arugula drizzled with a wee bit of balsamic, but the chicken is seriously good...even by itself, so eat it as you will. The apples really make this something, something that you must try for yourself.


College Contessas Rating: Can you say platform stiletto? YUM! 


Crackin' Blackened Chickpeas


In a (hugely successful) attempt to channel our inner Mediterranean goddess palettes, the College Contessas popped open a few cans of chickpeas, turned on the Dawgs, and got to making some positively crackin' exotic and healthy (double win!) football viewing snacks. The result? Crunchy, delicious, and wonderfully addicting balls of goodness. We mean this. Even the rogue seasoning in the pan was simply delicious. 

Ingredients:

-2 Cans of Chickpeas 
-3 Tablespoons Balsamic Vinegar (just make sure each chickpea gets a bit of the balsalmic-y goodness)
-2 Tablespoons Olive Oil
-Cracked Black Pepper (your discretion)
-Dash of salt

What to Do:
  1. Preheat oven to 425 degrees
  2. Open and drain chickpeas
  3. Dry them.
  4. Arrange chickpeas on cookie sheet, and with drizzle oil
  5. Proceed to douse with balsamic and salt 'n peppa  
  6. Place in oven, and bake for 30-40 minutes until crispy and golden! (a few towards the middle of the pan were crunchier than the rest, but hey!, embrace the crunch)
  7. Eat and embrace your inner Mediterranean spirit 

College Contessa Rating: Solid Corporate Pump


Friday, September 7, 2012

Pumpkin Spice Not-tè


This Contessa creation was something we were all looking forward to, however, as excited as we were, this just did not taste as great as it looked.  We thought this had wayyyy to much pumpkin, and it was like eating one right out of the patch...not in a good way.  We ended up adding some sugar, and we were able to salvage it in end.  The Contessas' concurred that the graham cracker crumbles on the top helped, but next time we will venture off to Pinterest and try another recipe.

This was our attempt at an exotic smoothie.

Ingredients:

-1 Can Frozen Pumpkin
-2 Tablespoon Brown Sugar
-1 Teaspoon Cinnamon
-1 Banana
-1/2 Cup Lite Yogurt
-Dash of Love

What to Do: 
  1. In a blender, blend all ingredients together!
  2. Top with Crushed Graham Crackers.


Contessa Rating: Kitten Heel